Showing posts with label DIY projects. Show all posts

3.28.2012

DIY: Robin Inspired Wreath


Yea, I'm so glad you're joining me for this wonderful spring DIY wreath.  You'll be sure to impress your guests with your style.

...{Supplies}...
for the wreath
a grape vine wreath {I made my own but they also sell them at craft stores}
1 can of spray paint {I used Kyrlon Blue Ocean Breeze}
 cardboard or a drop cloth

& for the super cute eggs
3 perfectly cheap plastic eggs
hot glue and a glue gun 
jute or a natural looking yarn


First
Lay your wreath on a drop cloth or piece of cardboard
Start shaking your spray paint {follow the directions for the best coat}


Second
 Paint your wreath 
{I like the shabby chic look so I didn't stress about getting the coat perfectly even}

Third
Let that baby dry
Turn on your glue gun and begin working on your eggs

Fourth
Start at one end of your egg and apply a dot of glue.
Press one end of the jute onto the warm glue
Continue working around the egg adding only as much glue as you can wrap before it dries.

Turning my vision into a reality was easier with the help of a sharpie. 

Switch it up: I used three different patterns for my eggs
{one wrapped lengthwise, one wrapped diagonally around the egg and one
with a swirled pattern}

Completely wrap each egg delicately cutting off the jute at each end.  
Leave your glue gun on.

Fifth
Hang your wreath to find the perfect orientation.
Once your wreath is hung lay the eggs onto the wreath and pick the composition that looks right to you.
Grab your glue gun and put a dot of glue on each egg.  Then secure it to your wreath.

Sixth
Impress all who come to your home!

...{If you enjoyed this post please consider sharing it}...

And as always let me know how your project turns out.
...{thanks ~erica}...

3.11.2012

DIY social media buttons ...{buttoning up}...

Here it is the third and final part to my series on creating your very own social media buttons from your drawing or picture.

As I mentioned in part 2 this same process can be done for a number of blogging needs.  If you haven't already read parts 1 and 2 check them out here.
Social media buttons part 1 ...{creating your art}...
Social media buttons part 2 ...{becoming a button}...
And here we go with part 3 ...{buttoning up}...

1st There are a few approaches to assigning your picture a html code.  Here's what I do.  Begin a draft blog post.  Don't post this just keep it in draft form.

2nd Insert an image.  Select the button you created during part 2.

3rd Right click on the button and select> open in a new window.

4th Copy the web address

5th If you already have social media buttons that connect users to your other social accounts the process from here is fairly simple.  If this button will be your first I found an AWESOME blog post that helped me to add my first buttons to my blog. Here is the blog post that really helped me get started Pep's Top Blog

6th Back to finish the job.
Let's assume you now have a gadget that allows you to add HTML format to finalize your buttons.  Open that gadget.


7th Paste the address for your picture within the quotes right after <img src="   "/>
...{see image above}...
8thPaste the address for your website ...{pinterste, etsy, facebook etc}... within the quotes right after <a href="    "target="_blank">
 ...{see image above}...
9thClick save.  Then view your blog to be sure things look just that way you were imagining.

Congratulations you have beautiful new social media buttons that are completely one of a kind.

...{If you found this series helpful please send it around and be sure to button up with this button made just for you}...  
 Click here to button up.


Thanks for trusting me to take you on this journey!

And as always if you have any questions about something you've seen here get in touch,
I'm glad to help!

3.10.2012

DIY Social media buttons ...{becoming a button}...

If you haven't already done so check out part 1 of this series DIY social media buttons ...{creating your art}...

Here's where things get a bit tricky.  But to be honest not to sound super cliche but if I can teach myself how to do this in a day I can certainly teach you how to with a blog post.

Please don't be scared off with the number of steps.  I literally put each action in it's own step to make it easier.

So to me this concept of creating your own handmade social media buttons is a simple way of showing your awesome blog followers a little piece of you.  And obviously this whole DIY project could be done for anything blog stickers or buttons and simple images.  Here we go...

Supplies:
GIMP  
...{Gimp is an image manipulation program~ best part is it's free~ 
I can't even say that.  There are so many awesome things about GIMP}... 
Check it out for yourself and don't just trust me read reviews online before you download.

The picture of your newly created masterpiece 
...{from part1 of this series}...

Your favorite beverage
...{this may take a while}...

A message about GIMP.  I just found this program last week.  In that short amount of time I've created my first blog banner, created the collages for my upcoming DIY projects and I've added my website to a number of my photos.  I don't know a single person who uses this program nor have I contacted the company but I did my research before downloading.  So far so good, my computer is still running smoothly and I've been able to experiment and create some awesome things all while teaching myself. 

I'll assume you've already downloaded GIMP.
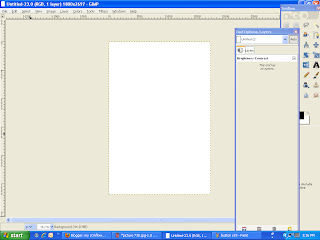
1st Open the program then go to File> Open> and select your picture.
Be sure that you have two open toolboxes Windows> select Toolbox & Windows> Tool Options, Layers


2nd Go to the main toolbox ...{with all of the little icons}...
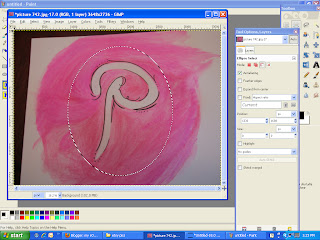
Select the circle tool 
...{if you'd rather you can use a square or 
if you're really adventurous you could use the free select tool}...
Don't be envious of my classy arrow in the top right.  I'll working on doing something better in the future~ promise!
3rd use this tool to make a perfect circle around the section of the image that you want to keep ...{for a symmetrical circle hold shift while forming your shape}...
If it's not centered simply click and drag the circle to where you want it
 or if it's not the right size grab onto a corner and drag to the shape you want

4th Press Control and X (to cut your shape out.) Don't panic when it disappears!

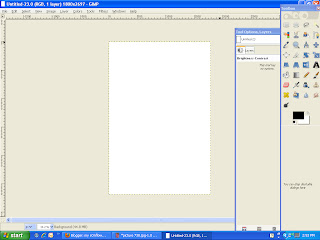
5th go to File>New> click OK (size doesn't matter right now)
From now on forget about your first file but don't close it just yet...{it's always great to have the option of opening it back up and pressing Control Z to undo your last cut in case something goes wrong with your new file I'm all about backup plans here people!}...

6th Transparency
Time to make your background transparent ...{I love this step it makes me feel so professional!}... 
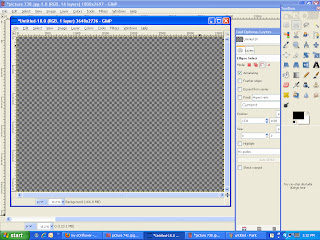
go to Layer>transparency>add alpha channel (your drop down menu will disappear)
Click in the blank white space and press Delete!
...{you'll end up with a gorgeous checkerboard indicating a transparent background}...

7th Press Control P (to paste your shape onto the transparent background)

8th Move your image to the upper left corner of the screen.

9th Go to the menu bar and select Image>Canvas Size

10th Using the small arrows decrease the size of the canvas until it fits snugly around the outside of your shape.  
You may need to deselect the chain button 
(as shown in the first picture below if your shape isn't exactly symmetrical)

11th Time to great creative ...{again}...
Go to the menu bar and select either Colors or Filters to experiment with some neat special effects.  For this project I went to Colors> brightness and contrast. 
Remember after ANY change that you don't like just press Control Z to get back to your previous state.  GIMP will allow you to Control Z about a zillion times in a row which is amazing.

 12th It's re size time!
Go to the menu bar and select Image>Scale image>adjust width and height to your desired size.
...{I went with 60px x70px 
turns out my shape was more oval than circle but I'm fine with that}...

13th Go to the menu> File> Save
I added .png to the end of your file name you could use .jpg or .gif also though some of these formats don't support transparent images from what I understand.
(blogger allows you to import .png files double check that your site does)

14th If you saved as .png new window will pop up click> export

15th The last window will pop up I click save.

Now your ready for the final part of this series ...{buttoning up}...~i promise part 3 is simpler}...  Way to hang in there and make a beautiful button you ROCK!

I'm glad to help.  If you have any questions send them my way!  
Hang in there and be sure to add the 
"I made my social media buttons with help from my sOnflower" button to your blog.

3.09.2012

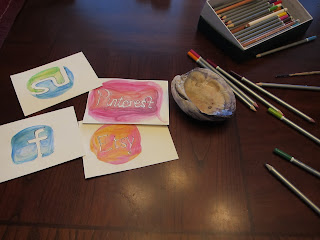
DIY social media buttons ...{creating your art}...

Super simple DIY social media buttons this concept is great for adding a personal touch to your blog or site!

Supplies:
paper
watercolor pencils
paint brush
Fine tip markers ...{make sure they're waterproof}...
water
to be honest you could use anything markers . crayons . a pen
...{I used watercolor pencils because they make very brilliant colors}...

 1st sketch your design and begin shading your piece.
Remember that when you apply water the colors will smudge together beautifully so tiny details may not come out exactly as they look now.

2nd Apply a small amount of water to your brush and delicately apply it to your paper.
If you have areas you want to emphasize trace them with the wet brush in the direction of your pencil lines.

Isn't this stuff awesome?  I'm so in love with watercolor pencils!  I remember the first set I "we" ever owned.  One year for Christmas my Aunt Jennie and Uncle Bruce sent my sister Amanda a set.  She was nice enough to share as we experimented making postcards.  I didn't realize how much I would come to love them so simple and cheery.   
...{Sorry back to the project}...


3rd Let your painting dry.  This shouldn't take to long.

4th Outline areas you want to emphasize with your fine tip marker.

Taa Daa!  A masterpiece. Scan or take a picture of your final work.  If you're taking a picture try to do so in natural lighting and without a flash.

Now it's time to edit this beauty in part2 ...{becoming a button}...

3.07.2012

Social Media Buttons

I just completed a cute little series of social media buttons.  Check them out to the left!  


The best part of these little beauties it that they're one of a kind.  And guess who painted those cuties.  That's right yours truly.  I love the idea of adding my handmade touch to this blog.  I'll be adding a DIY social media button post sometime very soon.  Not that there's anything wrong with the typical button look but I feel my followers will get to know me better with each personal touch I add to my sOnflower.

1.08.2012

DIY ...{Luminaries}...

Friday was my first crafting day of the year.  It was quite productive.  Here's a quick and inexpensive DIY project.  Hope you enjoy creating these as much as I do.  The look is so versatile and can be altered for any room of your home.  Of course the luminaries that you see here will be added to my sOnflower shop soon.


Pin It

You'll need:
~an empty glass container ...{sauce jar, wine bottle etc}...
~tissue paper or another thin paper ...{I've found some beautiful papers at the Art Store in
   Syracuse}...
~a nice complimentary ribbon, twine or lace
~inexpensive craft glue
~a touch of water
~a paint brush
~a battery powered candle
~any other embellishments you would like stamps, buttons etc.

First eat some delicious spaghetti smothered in pasta sauce.  Okay so I suppose using an empty container that's been sitting around your home or is rescued from your recycling bin would work fine too.  Clean it out, remove the label and any stamps that have been printed directly on the glass.  If you can manage get the sticky stuff off that's great too.  I've found that removing the annoying sticky stuff with Windex and paper towels should do the trick.  ...{don't beat yourself up perfectly removing the stickiness it'll likely be covered up later}...

Second. Select something to cover your jar with.  I've used tissue paper for the base of most of these pieces.  cut your paper to fit around your jar.  When measuring the height leave enough room to wrap your paper around the bottom and top of your glass.  I cut my paper to 7" x 11" this was the perfect size for my standard spaghetti sauce jar.

A side note. If you will be adding stamps now is the time.  Select a permanent ink ...{I used Staz-on black ink}... Stamp directly onto your glass container.  After the ink is dry you're ready to continue on.

Third. Mix an inexpensive glue ...{I used a store brand similar to Elmer's}... with water.  You want to get this to a paint like consistency.

Fourth.Coat your jar in glue painting the surface ...{I find that holding the inside of my jar kept my fingers pretty clean and allowed me to rush the project along nicely}...

 Fifth. Gently lay your paper onto the jar leaving room at the top and bottom to be wrapped under the bottom and to neaten the top edge.
Sixth.Use your slightly moist brush to smooth out the paper. ...{be careful not to readjust your paper once it's set it becomes very brittle and will tear easily.  If you're like me and wind up with a tear gently smooth it out with your brush coated in glue.  Still no luck?  Add a small piece of paper to cover up your goof}... 

Seventh. Add a brush of glue to the bottom of your container.  Then gently wrap your paper around the edge and pleat it on the base of the jar.
Eighth.To finish the top add another band of glue and fold the paper down on the outside of the jar.


Ninth.Once the glue has dried you're ready to decorate.  Some of my designs are very minimal paper and a nice ribbon, others include floral petals or burlap and twine.


Ta Daa.Be creative and enjoy!  I recommend using battery powered candles for these luminaries since most jars are so deep. If you have pictures of your project to share send them my way and I'll be glad to post them.

12.14.2011

Moss garden

So I live in what some call the snow capital of the North East the idea of months of complete winter makes me a bit sad!  Okay...{really sad}... I'm a sun and warm weather kind of gal!

I decided to take matters into my own hands to bring beautiful dashes of green into our home this winter.  I love the look of moss and decided snuggle moss from our yard in a planter.
Where did all of that dirt come from?  I found that a fork and spoon where the ideal size for this planter.
The moss I collected has sprigs of grass and little lawn weeds.  I love how they add spice to the fluffy moss.  I've been nursing the plant on the left since I rescued it from Wegmans years ago.  Don't get me wrong Wegmans is amongst my favorite places but the plant didn't look healthy there.  I'm not sure what it is.  Any ideas?
This beautiful moss creation now lives in our bathroom.  The added moisture keeps it happy.  And the best part is... we'll still have a little grass to cut all winter long!
I hope you have time before the snow flies to add some green to your home.  This project is so simple, easy to care for and will be a beautiful addition to your home this winter and beyond.  Comment below if you need tips.

12.02.2011

Busy Friday

What a busy day!  In addition to boring household chores I've completely revamped my blog page, doubled my etsy listings and joined Stumble Upon.  Some call it SU but I just can't do that ...{being a proud Central New Yorker}... SU is reserved solely for a Syracuse University.  Anyhow... Stumble Upon is pretty awesome.  You can find me at: http://www.stumbleupon.com/stumbler/mysonflower/

Very busy yet still not feeling accomplished until I turned up the pandora Christmas music and freed my mind a bit.  Then out of my imagination popped the most glorious idea.  You see there's been a few massive conk shells sitting in my studio begging for a purpose.  They're a completely blank canvas and finally it dawned on me Christmas conchs... how did I not think of this sooner.  

Time to turn on the broken hot glue gun and get to work.  I'll post pictures as soon as these masterpieces stop dancing in my head and begin their re~purposed journey as Christmas conchs.

10.28.2011

How to...{New cork board}...

So here's the new cork board I created this morning.  Isn't she beautiful?  Below are the steps that brought this new piece to life.  The total time to decorate and hang my board (once it was painted) was under 1 hour.
1. Paint your existing bulletin board (I used white acrylic gesso that included a hint of blue acrylic paint.)  The board will need about 12 hours to dry fully.  If you don't have gesso a plain acrylic paint should do just fine.

2. Draw the shape onto the back of the board.  Then used an x-acto knife and followed your lines to cut the entire shape out. 

3-5. Plan the design out in your head and began creating.  Use materials that are at your fingertips chances are there's no need to go shopping for this project.  (Here I used a hot glue gun to adhere ribbon to the board.  I also glued ribbon around the side of the board for a finished look.  Stamps were laid on the cork board with a corresponding copper color.)

6. Measure to find the center of the board and place marks on the back.  Then use a hot glue gun to adhere a plain ribbon to the back of your board.  This will be used as the guide when you thread the ribbon that will hang your board.

7. The berries and ribbon that I used where great to add dimension an otherwise lacking board.

8. Choose a wire ribbon in a corresponding color.  Take that ribbon and thread it through the ribbon you glued on the back of your board.  Tie a bow and hang your new board prominently in your home.  Enjoy!

I would love to post pictures of your new cork board here just send them my way.  Hopefully this project can help you tie your bulletin board (an essential part of our hectic lives) into the decor you have throughout your home.  Be creative and have fun!